My name is Andrea and I love to cook and experiment in the kitchen. I am a newlywed who loves to make meals for my husband as well as our friends & family. I am a complete amateur but I thought it would be fun to keep track of what I make and share my recipes. Bon Appetit!

Monday, February 25, 2008

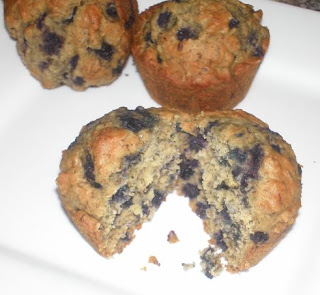
Blueberry, Bran, Flax Muffins

To my surprise my husband actually requested these. I was pleased to make them for him but I was worried that if I made a whole wheat, bran muffin it would be really dry. I added yogurt to it to moisten it up a bit and they are moist and delicious and I feel really good about eating them!
Blueberry Bran Flax Muffins

3/4 cup whole wheat flour
1/2 cup ground flax seed
1/2 cup unprocessed wheat bran
1/2 tsp. baking soda
1 tsp. baking powder
1/2 teaspoon salt
1/2 cup nonfat vanilla yogurt
1/3 cup honey
1/4 cup blue agave natural sweetener (if you don't have this add 1/4 cup extra honey)
1/4 cup canola oil
1/2 cup nonfat milk
1 large egg, beaten lightly
2 cups of frozen blueberries

Preheat oven to 350. Makes 12 muffins

Sift together the flour, flax, wheat bran, baking soda, baking powder and salt. After awhile the coarser bran and flax will remain in the sifter. Just turn over the sifter at this point and add it to the sifted flour and other dry ingredients.

In a separate bowl mix the oil and honey (measure the oil first in a liquid measuring cup then use the same cup to measure the honey and the honey will stick less), add the egg, milk, lemon rind and lemon juice.

Add the liquid ingredients to the dry. Mix only enough to wet the dry ingredients--don't vigorously beat.

Add the frozen berries and mix lightly to blend.

Put in muffin cups (good to use the papers--so the muffins don't stick) and bake for 30-35 minutes (until a knife goes into the muffin and comes out basically dry--if it comes out with wet batter, the muffins are not done enough).

Don't over bake--they simply are not good when you do! Let cool for a 5-10 minutes before removing from the pan.

Enjoy!
Saturday, February 23, 2008

Black Bottom Coconut Bars

FOR CHOCOLATE BASE
1/2 cup (1 stick) unsalted butter, plus more for pan
1/2 cup sugar
1/4 teaspoon salt
1 large egg
1/4 cup unsweetened cocoa powder
1/4 cup all-purpose flour (spooned and leveled)

FOR COCONUT TOPPING
2 large eggs
3/4 cup sugar
1/2 teaspoon vanilla extract
1 cup all-purpose flour (spooned and leveled)
1 package sweetened shredded coconut (7 ounces), 1/2 cup reserved for sprinkling

For chocolate base:
Preheat oven to 375 degrees. Line a 9-inch square baking pan with aluminum foil, leaving a slight overhang; butter bottom and sides of foil (not overhang).

Place butter in a large microwave-safe bowl; melt in microwave. Add sugar and salt; whisk to combine. Whisk in egg, then cocoa and flour until smooth. Spread batter in prepared pan.
Bake just until sides begin to pull away from edges of pan, 10 to 15 minutes (do not overbake). Let cool slightly while preparing coconut topping. Keep oven on for topping.

For coconut topping:
In a medium bowl, whisk eggs with sugar and vanilla. Gently mix in flour and coconut (except 1/2 cup reserved for sprinkling).
Drop mounds of mixture over chocolate base; spread and pat in gently and evenly with moistened fingers. Sprinkle with reserved 1/2 cup coconut.

Bake until golden and a toothpick inserted in center comes out with moist crumbs attached, 25 to 30 minutes. Cool completely in pan. Lift cake from pan, peel off foil, and cut into 24 bars.

Store in an airtight container 3 to 4 days.

Tuxedo Cookies


2cups all-purpose flour, plus more for work surface
1/4 teaspoon salt
14 tablespoons unsalted butter, softened
1 cup confectioners' sugar
1 large egg yolk
1/4 teaspoon pure vanilla extract
2 tablespoons unsweetened Dutch process cocoa powder

Sift flour and salt into a medium bowl; set aside. Put butter and sugar into the bowl of an electric mixer fitted with the paddle attachment, and mix on medium speed until pale and fluffy, 2 to 3 minutes, scraping down sides of bowl as needed. Reduce speed to low. Mix in egg yolk and vanilla. Gradually add flour mixture; mix until just combined, about 1 minute.

Remove half of the dough; set aside. Add cocoa powder to remaining dough; mix on low speed until well combined. Turn out chocolate dough onto a lightly floured work surface. Roll into a 10-inch log, about 1 1/2 inches in diameter. Repeat with reserved vanilla dough. Wrap each log in plastic wrap, and refrigerate until slightly firm, at least 30 minutes.

Press handle of a long wooden spoon into side of chocolate log, making an indentation along its length. Roll handle into and then away from log, creating an apostrophe shape. Repeat with vanilla log. Fit logs together; press lightly to seal. Gently roll into a 2-inch-diameter log. Wrap in plastic wrap, and freeze until firm, about 30 minutes.

Preheat oven to 350 degrees. Cut log into 1/4-inch-thick rounds; space 1 inch apart on baking sheets lined with parchment paper. If dough becomes too soft to slice cleanly, return to freezer until firm.

Bake until firm to the touch, 10 to 12 minutes. Transfer to wire racks; let cool. Cookies can be stored in airtight containers at room temperature up to 3 days.

Sweet Treats

I spent the entire afternoon baking today. Tomorrow is my Grandma's birthday party and as always, I had nothing for her. I couldn't think of anything to go out and get for the woman who has it all. She has a pretty big sweet tooth so I decided to bake her present. These are are the 3 treats I came up with. I hope she likes them, I thought they all tasted pretty good! I got all 3 of the recipes from the Martha Stewart website.

Macadamia Maple Sticky Bars


1/2 cup plus 6 tablespoons (1 3/4 sticks) unsalted butter, softened, plus more for dish
1 1/4 cups all-purpose flour
1/2 teaspoon salt
3/4 cup coarsely chopped toasted macadamia nuts, (about 4 ounces)
1/4 cup plus 3 tablespoons packed light-brown sugar
2 teaspoons pure maple syrup
1/4 cup finely chopped crystallized ginger
1/4 cup plus 1 1/2 teaspoons maple sugar
2 tablespoons light corn syrup
3 tablespoons heavy cream


Butter an 8-inch square baking dish; line with parchment, allowing a 2-inch overhang on 2 sides. Butter lining (not overhang); set aside. Whisk flour, 1/4 teaspoon salt, and 1/4 cup nuts in a bowl.


Preheat oven to 350 degrees. Put 1/2 cup butter and 1/4 cup brown sugar into the bowl of an electric mixer fitted with the paddle attachment; mix on medium speed until pale and fluffy. Mix in flour mixture and 1 teaspoon maple syrup. Press dough evenly into bottom of prepared dish. Refrigerate 30 minutes. Bake until set in center and pale golden, 22 to 25 minutes. Transfer to a wire rack; let cool slightly.


Put remaining 6 tablespoons butter and 1/2 cup nuts into a small saucepan. Cook over medium-high heat, stirring constantly, until butter is very foamy and nuts are fragrant, 2 to 3 minutes. Add remaining 1/4 teaspoon salt, 3 tablespoons brown sugar, 1 teaspoon maple syrup, the ginger, maple sugar, corn syrup, and cream. Boil, stirring constantly, 2 minutes. Spread over crust. Let cool completely. Lift out of dish by overhang. Cut into sixteen 2-inch squares. Bars can be stored in an airtight container at room temperature up to 3 days.

Thursday, February 21, 2008

Garlicky Bean and Chicken Enchiladas

I found the recipe for the Garlicky Bean Enchiladas in the March '08 issue of Rachel Ray. I decided to add shredded chicken to them and they were excellent. My husband said "we could have gone to a mexican restaurant and our meal wouldn't have been nearly as good"! I have to agree, they tasted like they came from a gourmet mexican restaurant. I put my chicken in the Crock Pot with 1 packet of taco seasoning and about 1/2 cup of chicken broth and let it cook about 4 hours until it shredded on its own. I made homemade spanish rice to go along with this and used brown rice to make it a bit healthier. Boxed spanish rice would also work.


Garlicky Bean & Chicken Enchiladas

2 chicken breasts, shredded
1/2 cup plus 2 T olive oil
2 cloves garlic, minced
2 cans cannelloni beans, drained
1/4 cup chopped cilantro
12 6 in. round corn tortillas
2 cups store bought salsa verde
1 cup shredded pepper jack cheese

Preheat oven to 375. In a medium saucepan, heat 2 T oil over medium heat. Ad the garlic and cook until just golden, about 2 minutes. Stir in the beans and cook for 1 minute. Season w/ salt and pepper and mash with the back of a fork while continuing to cook for about 7 minutes. Take off heat and add the cilantro. Meanwhile, line a baking sheet with paper towels. In a small skillet heat 2 T of oil. Fry tortillas 1 at a time for about 5 seconds per side until starting to bubble. Add more oil as needed. Transfer fried tortillas to paper towels to drain (I tried to skip this step but the tortillas crumble if they are not fried first). Place about 1/4 cup of the beans and 1/4 cup of the chicken on 1 tortilla and roll to close. Transfer to a prepared 9 by 13 inch baking dish. Repeat with the remaining beans, chicken and tortillas. Pour the salsa over the filled tortillas Sprinkle the cheese on top. Bake until the cheese is melted and the salsa is bubbling, about 20 minutes.
Serve with sour cream.
Spanish Brown Rice
1 T olive oil
1/2 medium onion, chopped
2 cloves garlic, minced
2 cups brown rice
1 package taco seasoning
1 can diced tomatoes w/ liquid
2 cups chicken broth
In a medium pot heat oil on medium heat. Add garlic and onion and saute until they become opaque. Add rice and saute for 2 minutes. Add taco seasoning and mix. Add tomatoes w/ liquid and the chicken broth. Reduce heat to low, cover and simmer until rice is tender, approximately 25 minutes.
Enjoy!

Wednesday, February 20, 2008

Chicken & Dumpling Soup


I have to admit, this meal was better the 2nd day. It was great on day 1 too but on day 2 it kind of turned into a stew and it was delicious with a little dollop of sour cream on top. For the chicken in the soup, I put 2 chicken breasts in the crock pot for about 5 hours on low with a package of dry chicken gravy and about 1/2 cup of chicken stock. When they were done they fell apart and easily shredded. You could also just use cooked, diced chicken breasts if you don't have the time to slow roast them. Rather then real dumplings I used large gnocchi which are potato dumplings. I used pesto & cheese filled frozen gnocchi from Trader Joes and they were soft, plump and flavorful.

Chicken & "Dumpling" Soup

2 boneless, skinless chicken breasts, cooked & shredded
2 T olive oil
1/2 of a medium onion, diced
2 carrots, diced
2 garlic cloves, minced
1 celery stalk, diced
1 bay leaf
2 T poultry seasoning
2 T Italian seasoning
2 T all purpose flour
1 qt chicken stock
2 cups water
5 small yellow potatoes, diced
1 cup frozen corn
1 cup frozen green beans, chopped
1/2 cup fresh basil, chopped
1 package fresh or frozen gnocchi
Salt & Pepper

Heat olive oil over medium heat in large pot. Add garlic, onion, carrot and celery and cook for 5 minutes until vegetables start to become tender. Stir the bay leaf, poultry seasoning & italian seasoning into to the vegetables. Mix in the flour until combined. Add the chicken stock and water and mix well. Add potatoes, corn and green beans and simmer soup for about 30 minutes until all vegetables are cooked. Season soup with salt and pepper. Depending on whether you are using low sodium chicken stock or not, it may need quite a bit of salt. Add gnocchi and basil and cook for another 10 minutes. Serve immediately with crusty bread for dipping.

Enjoy

Monday, February 11, 2008

A Balanced Meal

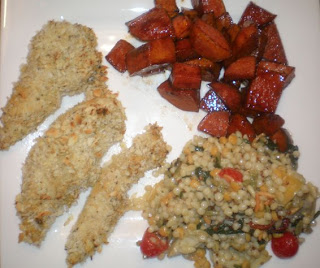
These are three of my old standby recipes that are all excellent. Each are good on their own but tonight I made them together for the full meal deal effect. All three are also healthy and easy to make. Definitely crowd pleasers.

Chicken Tenders

1lb chicken tenders
1/4 cup dijon mustard
1 T honey
1 T olive oil
11/2 cups panko
1 T dried basil
salt & pepper

Preheat oven to 425 degrees. Mix dijon, honey and olive oil in large bowl. Season chicken with salt & pepper. Add all tenders to the dijon mixture and toss to coat. On a large plate combine panko & basil and season with salt & pepper. Dredge each chicken tender in the panko mixture. Arrange all coated tenders on a baking sheet and bake for 15 minutes. Serve immediately.


Orzo Salad
For this one I use the Harvest Blend from Trader Joes that includes orzo, quinua, couscous & garbanzo beans. Plain orzo will work just fine too. You could also add diced chicken to this salad to make it main course.

2 cups harvest blend
2 cups chopped fresh spinach
1 cup chopped fresh basil
1 cup cherry tomatoes, halved
1 can artichoke hearts, roughly chopped
1/4 cup parmesan cheese
1 T dijon mustard
1/4 cup apple cider vinegar
1/4 cup olive oil
1 T honey
salt and pepper


Cook orzo or harvest blend per directions. Once cooked add 2 T olive oil to the cooked pasta to prevent sticking. Add chopped spinach, basil, tomatoes & artichoke hearts. Add Parmesan and salt & pepper to taste.

Whisk dijon, vinegar, olive oil and honey in a bowl until combined. Pour over pasta and toss to combine.

Can be served immediately warm or refrigerate up to 24 hours and serve chilled.


Roasted Balsamic Sweet Potatoes
These are from the April 2007 issue of Bon Appetit

4 large red skinned sweet potatoes (yams), peeled and cut into cubes
1/2 cup balsamic vinegar
4 T brown sugar
1 T butter
1 T olive oil
2 t salt

Preheat oven to 400°F. In large skillet over medium heat, bring balsamic vinegar and brown sugar to boil, stirring until sugar dissolves. Reduce heat and simmer until vinegar thickens slightly, about 3 minutes. Add butter & olive oil and salt and stir until butter melts. Add potato pieces to skillet; toss to coat. Season potatoes with freshly ground black pepper. Spread potatoes evenly on rimmed baking sheet. Bake until potatoes are tender and golden, stirring occasionally, about 40 minutes. Transfer potatoes to large platter or bowl and serve.


Enjoy!

Friday, February 8, 2008

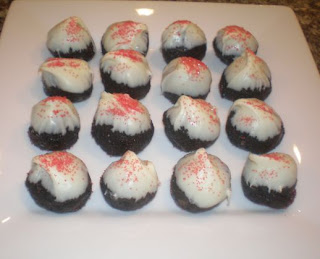
Valentine Balls of Love

These are so easy, so tasty and very cute little things! They are a delightful little addition to any party or holiday. It's pretty tough to go wrong with Oreo Cookies and cream cheese. I was first introduced to them by my Aunt Julie around the Christmas holidays. She topped them with crushed candy cane. You can decorate them for any season, party or holiday!

Oreo Balls

1 package Oreo Cookies
1 80z package cream cheese, softened
1 package white chocolate chips

Grind Oreo cookies in food processor in batches until they are all finely ground. Add softened cream cheese and beat or mix well. Roll the Oreo and cream cheese into small balls and refrigerate for 20-30 minutes.

Melt the white chocolate in microwave or over a double broiler until melted and smooth. Stick a toothpick in the bottom of each of the chilled Oreo balls and dip the top in the melted chocolate. Decorate as desired.

Enjoy!

Saturday, February 2, 2008

Chop Chop

I was craving one of those chopped salads that so many restaurants serve these days. The kind that has a lot of different textures and flavors all wrapped up in a crispy, fresh salad...Yum! After rummaging through my fridge and pantry this is what I came up with. It was very tasty and I can't wait to eat the leftovers!

Chop Chop Salad

1 head ice burg lettuce, finely chopped
2 pears, peeled and diced
1 cup crumbled blue cheese
1 cup dried cranberries
1 cup chopped walnuts
2 chicken breasts, cooked and diced
Dijon Vinaigrette- recipe below

Mix all ingredients together in large bowl and toss with the vinaigrette. Serve immediately.

Dijon Vinaigrette

1 garlic clove
1/2 cup olive oil
1/2 cup cider vinegar
2 T dijon mustard
3 T honey

Blend all ingredients in a food processor or blender until combined and dressing is creamy.

Toss with Chop Chop Salad